
Alcohol Markers….well….yeah.
I’m in no way an ARTIST especially with markers and/or crayons. I can’t draw, sketch or colour to save my life! I can do some really basic things with these mediums, so I was nervous when i started Altenew’s Magical Marker Techniques class. But It’s part of the level 2 for the Altenew Educator Certification Program that i’m determined to finish, so I pushed play.
Now … it wasn’t nearly as scary as I thought it would be, but it definitely opened my eyes to ways to embrace alcohol markers. I have the full set of Altenew Artist Markers (Full 60 Count), which yes I realize may seem silly considering I don’t know how to use them well lol, but…I purchased them with the intention to try to use them….so here we are. I’ve used them a handful of times up to now, but after taking this class I definitely think i’ll be whipping them out more often.
As I was thumbing through my Altenew stamps, I was drawn toAltenew’s Build-A-Flower: Fuchsia stamp set and I decided to do an encouragement card.

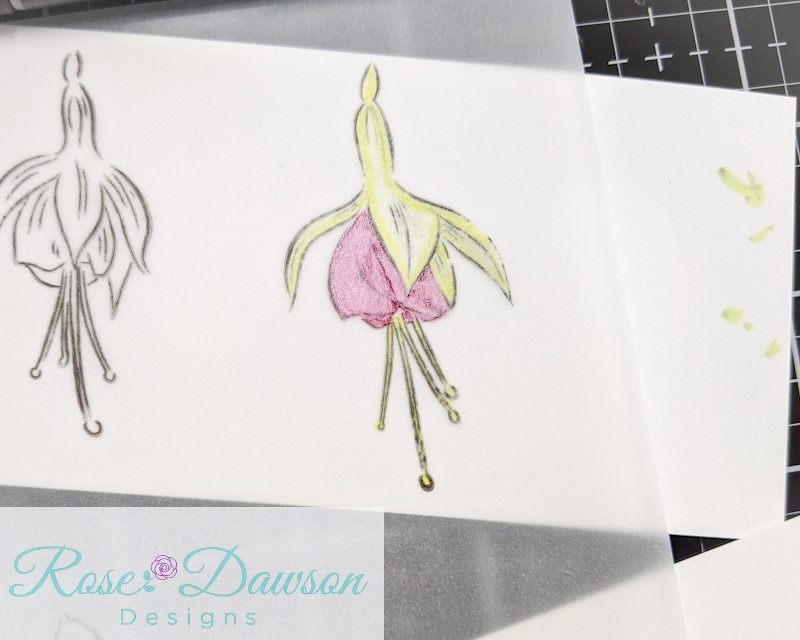
I’ve always loved the look of vellum on a card, so I opted to use the marker on vellum technique from class. I started off by stamping both flowers, the bud and both leaves on an A2 panel of Simon Says Stamp Vellum using my MISTI Stamping Tool and Gina K’s Jet Black Amalgam Ink. Using a MISTI (or other stamping tool), always you to restamp in the exact same spot if needed and with the vellum I thought it might be a good idea as it doesn’t typically take ink well.


After letting the vellum and ink dry for a while, I placed a bit of scrap white cardstock behind the vellum so I could see the colours properly as I was applying them.

I started off with one of the flowers and the Altenew markers in Puffy Heart and coloured in the entire lower portion of the flower with it. I tried not to touch the black in too much as I didn’t want to smudge it.

Then I added a bit of Purple Wine marker around the edges of the flower section to add a bit of depth to the flower.

Then I added a smidge of Cosmic Berry marker for a little more colour. Then I went back over a few sections with the Puffy Heart marker just to blend it a bit. Now…blending doesn’t work well on vellum as it doesn’t absorb the ink well, but I didn’t want harsh lines on my flower, so I just touched it up a bit with that lighter colour.

On to the greenery…I used Frayed Leaf, Bamboo & Parrot, following the same technique as I did with the purples. I started with Frayed Leaf all over the greenery sections.

Then I went over the edges with the Bamboo marker as well as the stamen on the bottom. Then I added just a smidge of Parrot on the top of the greenery for a little bit more depth.
I repeated the same colouring technique on the smaller flower, and then just the greens on the bud.

For the leaves, I used the Bamboo all over the leaves, then added a bit of Parrot colour down the center and along the edges for some depth of colour.

Then I grabbed the coordinating dies and cut everything out using my Spellbinder Platinum 6 die cutting machine (use whatever machine you have).

Then I grabbed an A2 sized panel of Neenah Solar White cardstock and stamped the branches using Simon Says Stamp’s Acrylic Blocks. I dry fitted the flowers and bud to see exactly where I wanted the branch and stems to go. I stamped using Gina K’s Amalgam ink in Jet black again. Then I placed the sentiment as well to the bottom right. I used a beautiful sentiment from Altenew’s One Day At A Time stamp set and more of Gina K’s Amalgam Jet black ink. I used the Gina K ink as it holds up well against alcohol ink.


Then I wanted to add a bit more colour to my panel, so I used the splatter technique from the class just for a subtle splash of colour. Essentially, you scribble your alcohol marker(s) on to a craft sheet or a glass surface, then add a bit of standard rubbing alcohol (allows some movement of the ink). In the class, they used a stipple brush, but I don’t have one, so I grabbed an old paintbrush, dipped it into the alcohol ink solution and then just tapped my finger on the brush to get some splatters. PLEASE be careful not to get this all over the place…you could always use a box to catch excess splatter. I added splatters of Cosmic Berry, Parrot and Jet Black.

I also added a few splatters of Nuvo Aqua Shimmer pen. I squeezed out a little bit of the ink on the craft sheet, and then just dipped the tip of the pen in it and again tapped on the pen to get a few splatter dots – this adds just a touch of shimmer to the card.
I cut my panel down to approximately 3.75×5 inches and then adhered it to a panel of Simon Says Stamp’s Cardstock in Slate that measures approximately 4×5.25 inches. Then I adhered everything to an A2 cardbase of Neenah Solar White Cardstock.

Then I used a bit of vellum taperunner (hides a bit better behind vellum than some other adhesives) and applied it to each of the vellum pieces and then adhered everything down to the panel as I had previously dry fitted them.

I stamped another one of the fuchsia flowers to the bottom left corner a coordinating envelope using Altenew’s Crisp Dye Inks. I used just the outline and third layer of the flowers (I skipped the second layer) to keep it a little more artsy looking. I used Altenew Obsidian Pigment Ink for the outline, then Altenew’s Crisp Dye Ink – Parrot, Altenew Crisp Dye Ink – Bamboo & Altenew Crisp Dye Ink – Cosmic Berry for the colouring. It didn’t match perfectly, mainly because I used the markers on vellum instead of cardstock, but it was close enough for me to go ahead with it. And my card is complete.
I really love the look of the markers on the vellum as it gives everything a nice ethereal look to it, which I especially think works well with this encouragement card and that delicate font.


Altenew Stamps:
Inks/Markers
–Altenew Artist Markers (Full 60 Count) – Cosmic Berry, Purple Wine, Puffy Heart, Frayed Leaf, Bamboo, Parrot, Jet Black,
– Altenew Obsidian Pigment Ink
– Altenew’s Crisp Dye Ink – Parrot
–Altenew Crisp Dye Ink – Bamboo
– Altenew Crisp Dye Ink – Cosmic Berry
-Gina K Designs’s Jet Black Amalgam Ink
Other Supplies:
– Neenah Solar White cardstock (SSS)
–Simon Says Stamp’s Cardstock – Slate
– Tombow Mono Multi Liquid Glue (SSS)
– Vellum Tape Runner
– Rubbing Alcohol
-Paintbrush (cheap)
Tools:
– My Sweet Petunia’s MISTI Stamping Tool (SSS)
– Tim Holtz Mini Comfort Trimmer (SSS)
– Simon Says Stamp’s Grid Transparency (SSS)
– Simon Says Stamp’s Acrylic Blocks (SSS)
– WOW Dual Speed Heat Tool (SSS)
–Spellbinders Platinum 6 Die Cutting Machine
– Anti-Static Powder Bag
–Tom Holtz Tonic Glass Media Mat


You achieved a really bold colour result on vellum, looks awesome!
Thank you for entering your work to the AECP assignment gallery. Well done!
LikeLike